

By Sofía©
I created this Tutorial in PSP X.
I created this Tutorial in PSP X.
I'm very grateful to Patry for her generosity in allow me to use her beautiful tubes
in this tutorial.
in this tutorial.
Elements Used:
Tubes, brush, Font: Latin
Filters:
L&K, filter Trix
L&K, filter Djin
Adjust- Variations,
Fm Tools, Blend Emboss and Simple: Pizza Slice Mirror
L&K, filter Djin
Adjust- Variations,
Fm Tools, Blend Emboss and Simple: Pizza Slice Mirror
Put the filters in your Complements' folder in your PSP.
Open the brush and export it as a personalized brush.
Open the tubes, duplicate them with capital letter + D, close the original, in the copy eliminate the mark of the tuber and the background if it has. Minimize it.
Let's go
1. Open new image 550 x 400 pixels, transparent background
2. In your Materials' Palette, set the colors:
Foreground: #c0c0c0 (gray) and Background: #ebddd4
3. Fill the layer with the Tool Flood Fill with your color of the Foreground: #c0c0c0
4. Prepare a gradient with this colors: Foreground #cdb1ab and background #ebddd4,
and this settings: Linear style - Angle: 45 - Repetitions: 1 - Invert: See it in the capture:

5. Layers, New Raster Layers and fill with the gradient
6. Effects, apply the filter L&k: Trix, with this settings:
6. Effects, apply the filter L&k: Trix, with this settings:

7. Effects, L&K / Djin, with this settings:
8. Effects, Edge effects, Enhance
9. Effects, Adjusts / Variations, click once on Red, yellow, blue and red one again (in this order), click in light once and accept.
10. Effects/ Simple Filter/ Pizza Slice Mirror (it has predetermined values).
11. Change Blend Mode of this layer: Overlay.
12. Effects / FM Tools / Blend Emboss (it is predetermined).
13. New layer, Selection Tool / Custom Selection and apply this settings:

14. Palette of materials Foreground: #c1a29d, with the Tool Flood Fill (little bucket)
and fill our layer " rectangle "
15. Decrease the opacity of the layer to 75 % and Selection / Selection none.
16. New layer, palette of Tools, Tool rectangle: line of dots and width: 2
In your Materials: Foreground: #f1e5d7 and Background: closed
and fill our layer " rectangle "
15. Decrease the opacity of the layer to 75 % and Selection / Selection none.
16. New layer, palette of Tools, Tool rectangle: line of dots and width: 2
In your Materials: Foreground: #f1e5d7 and Background: closed
17. Make a rectangle inside our brown rectangle, look in capture,
(that you will see of dark color because it is before the dotted line is seen,
I make it like that so that it is possible to look).
(that you will see of dark color because it is before the dotted line is seen,
I make it like that so that it is possible to look).

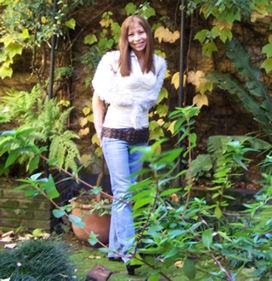
18. Open the copy of the tube: PatryMists_06_Elegant_11, we going to the Girl's layer
19. Image - Mirror,
20. Image/ Resize to reduce at 78 %, bicubic, Resize all layers: WITHOUT CHECK
21. We copy and paste as new layer in our workarea,
we this tube at the left size like in the final result.
22. Effects, 3D Effects / Drop Shadow: 2 /-2 / 85 / 10 / color: #be9f9b
23. Open the copy of the tube: PatryMists_06_Flowers_89
24. Image / Resize to reduce 62 %, bicubic, Resize all layers: WITHOUT CHECK
25. Copy and Paste as new layer in our work area, put this flowers at right side of the girl,
look in the final result.
26. Change Blend Mode: Screen and Decrease the Opacity: 100 %
27. Duplicate this layer: Change Blend Mode in this layer duplicated to Normal, Opacity: 85 %
28. In your palette of materials:Foreground: #a78079, Background: closed.
29. Layers, New Raster Layer: Open the brush " agi-textureLoveLetters " size 280,
Step: 32 Density: 100 Rotation: 0, Opacity: 100, Blend Mode: Normal.
30. Apply once over the flowers, look in the final result.
31. Layers - Arrange – Move Down and put it underneath the layer of the girl (You must move the layer four times ó if you prefer, from your palette of layers you take it with the right button of the mouse and arrange it directly below the layer of the girl.
32. Open the tube of the eye, Copy and Paste as new layer. Arrange in the right top apex, look in the final result.
33. Open the copy of the tube PatryTubes_06_ValentineD_16,
we going to this layer with the small envelopes.
34. Image, Resize to 50 %
35. With the selection tool configured in rectangle you draw a rectangle over one of the small envelope with the heart and Copy and paste as new layer in your work area, arrange to the botton right side at same hight that the eyelet,
36. Image – Mirror
37. Effects, 3 D Effects, Drop Shadow: 2 /-2 / 85, 8 / color: #92716e
38. Minimize the tube of the small Envelopes because then we will use it.
39. Layers – New Raster Layer, tool rectangle with your palette of materials: Foreground: the first gradient that we did, and background: white
40. Make a very thin rectangle, from the eyelet up to the small envelope, look the final result.
41. Effects, Texture Effects - Weave: with this settings:

42. Effects, Edge Effects: Enhance
43. Effects, 3 D Effects, Drop Shadow: 2 /-2 / 85, 8 / color: #92716e
44. Open the copy of the tube PatryTubes_06_ValentineD_16 that you resized before, Select the small envelope that says: “With Love” as new layer.
45. Image - Free Rotate: Left direction - Degrees: Free:5 All layers: without check
43. Effects, 3 D Effects, Drop Shadow: 2 /-2 / 85, 8 / color: #92716e
44. Open the copy of the tube PatryTubes_06_ValentineD_16 that you resized before, Select the small envelope that says: “With Love” as new layer.
45. Image - Free Rotate: Left direction - Degrees: Free:5 All layers: without check
46. Image, Resize and resize (again): 90 %
47. Effects, 3 DEffects, Drop Shadow: 2 /-2 / 85, 8 / color: #92716e
48. Open the copy of the tube PatryTubes_06_Elements_11, we going at the layer with te small bows, choose the color beige dark, with your tool selection, configured in rectangle.
49. Copy and Paste in your work area as new layer, put on the eyelet without cover it completely
50. Image, Resize 85 %
51. Effects, 3 D Effects, Drop Shadow: 2 /-2 / 85, 8 / color: #92716e
52. Layers, Merge all
We are going to make the frame:
53. Image / Add Borders: 1 pix., symmetrical, color: #be9f9b
54. Image / Add Borders: 3 pix., symmetrical, color: #f1e5db
55. Image / Add Borders: 1 pix., symmetrical, color: #be9f9b
56. Image / Add Borders: 25 pix., symmetrical, color: #f1e5db
57. With the magic wand, select this border and fill with the little bucket
with our gradient of 45º
58. Selection - Invert selection
59. Effects - 3 D Effects - Drop Shadow: 2 / 2 / 65 / 12 color: #92716e
60. Effects - 3 D Effects - Drop Shadow: -2 /-2 / 65 / 12 color: #92716e
61. Selection – None Selection
62. Image / Add Borders: 1 pix., symmetrical, color: #be9f9b
63. Image / Add Borders: 3 pix., symmetrical, color: #f1e5db
64. Image / Add Borders: 1 pix., symmetrical, color: #92716e (Watch here! because it changes ;)
If you wish resize, in this case I did it to 90 %
65. Layers, New Raster Layer for your name, in this case I used the font: Latin, size 58 white color
66. Effects - 3 DEffects – Drop Shadow: 1 / 1 / 65 / 2 color: #92716e
67. Add a layer for your watermark if it is your custom.
68. Save as Optimized JPG.
Yes! We finish! :) I hope you enjoyed it.
Sofía©
©Copyright Tutorial " Tag Beige Delicate " By Sofía©
Written especially for PSPFULLADDICTION©05-04-2006
Buenos Aires - Argentina
Translate By Sofía©
02-02-2008


No comments:
Post a Comment