8/24/2009

***** INMEDIATELY CHANGES *****

Inmediately Changes

  Do to Copyright restrictions this puts me in the situation that I have to remove all of my shared files: My Tubes, Scrapbooking Sets and Tutorials Elements, etc.
It is something I don't feel comfortable doing after all this years but I have no choice, it's like this.

So, I'll start a new personal website exclusively for my artwork and desings: www.norascott.com where you'll be able to purchase my new tubes, images and all my future designs.

My apology for the inconveniences and I hope you understand that according to the copyright my artwork is original and I hold the copyright in every piece I designed, it is something that I have to do.

Thank you so much for your support and I hope you follow me in this new time.

Kisses & Peace

Nora

6/10/2009

TUT 15 "OH LA LA PARIS"


By Sofía©
I created this tutorial in PSP X.

I want to be grateful to Mariel -Tubes Bellisimo- and Patry -Sin Tubes -
to allow me to use her beautiful tubes in this tutorial,
to her the responsibility to make the tubes and the Image's Copyright belong at their authors.


Materials Used:


Tubes, Font: Bernhard Fashion


Filtros:

FLAMING PEAR, Píxel Trash - FM TOOLS, Blend Emboss,
XERO, Tekstya (I love this filter... do you can see? haha) XERO, Porcelain,
MURA´S MEISTER, Copies, You can download them in each name of filter


Put the filters in the Complements' folder in your program PSP.
Open the tubes, duplicate it with Shift + D, then close the original,
in the copy eliminate the mark of the tuber and the background if it has.
Minimize it.


Let's go


1. Open New Image of 600 x 450 pixels.


In your Materials' Palette: Foreground color: #e5c6ab (beige) and Background: #952418 (bordeaux)
Make a gradient: Style: Radial - Angle: 180 - Repeats: 5 - Invert: CHECK IN -


Center Point: Horizontal 25 - Vertical: 47. Look in the capture:


Fill your first layer with this gradient. Name this layer "Base Color".
Effects / FLAMING PEAR, Píxel Trash apply the settings that you look in the next capture:


Effects / FM Tile Tools / Blend Emboss apply directly (is pre-setting)
Effects / XERO / Tekstya apply the settings that you look in the capture;
in this case the clear color is: #e5c6ab


Effects / XERO/ Tekstya apply four (4) times the filter with the settings that you look in the capture:
in this case the clear color is: #e5c6ab and the dark color is: #952418


Image / Mirror
Copy and Paste this layer as New Image and minimize it, we will use it more late.

2. Open the copy of the Tube Marif_2006_septembre_face0146.
Image - Resize: Resize at 85%. Copy and Paste as New Layer.
Arrange the girl's tube like you can see in the final example of this tutorial.
Layer / New Layer.
In your Materials' Palette make a gradient with the same colors that the first gradient,
only change: Style: Linear - Angle: 45 - Repeats: 1 - Invert: WITHOUT CHECK.
Rectangule Tool: Line Solid - width: 3.
Draw a rectangle from the top left apex that includes the complete face of the girl.
Layer / New Layer. Selection Tool in Magic Wand and Select inside of the rectangle.

In your Material's Palette put as Foreground: white:
#ffffff
and fill your select rectangle with this color. None Select.
Layer / Arrange/ Move down, repeat twice this step,
until the white rectangle is underneath of the girl's face.
Down the layer opacity white rectangle at 44%.
Open the tube copy PatryMists_06_Cityscape_21
Copy and Paste like a New Layer,
for put this tube take like reference the ray of light that you have from


the initial gradient, use like guide, the final result.
Change Blend Mode to Screen at 100%, name this layer "Torre 1"
Duplicate this layer and change blend mode of this layer at Multiply at 82%, name it "Torre 2"
Arrange both layers underneath of girl's tube, take care that the layers "Torre 1" will be (below)
and "Torre 2" (above).


In your layer "Torre 2" apply this Effects / 3D Effects / Drop Shadow: 2 / 2 / 80 / 15 color: #e3ae5b
Open the copy of tube Marif_2006_juillet_fumee02.
Copy and Paste like New Layer, arrange like you can look in the final result.
Change Blend Mode of this layer at Luminance (Legacy) at 57%
Come back to the Girl layer, duplicate it.

Layer - Arrange / Move up, make sure that is below of your layer with the rectangle.
Open copy of tube PatryTubes_06_Objects_42.
Copy and Paste as New Layer
Image / Resize: Resize at 35%. And put it in the center of your work area.
Effects / MURA´S MEISTER, Copies with the settings that you can look in the capture.
Apply the filter make sure the settings are that I putted and the color is the same: #952418


Put the parfums line that made this filter in the bottom part of your tag,
like you can look in the final result.
Change Blend Mode at Screen at 100%.
Effects / FM TOOLS – Blend Emboss apply directly.
Merge visible layers.
Selections - All Select - Modify - Contract selection: 2
Selections - Inverse. Give Delete in your keyboard.
In your Palette's Material: Color Foreground: #e3ae5b (mustard yellow).

If you ask yourself why I didn't add borders directly, let me tell you that when you use the Xero Tekstya Filterconfigurate for make puntille can leave the borders not too much neat,
to avoid this is that we did this last step.

Image / Add borders: 30 Symmetric: Check Color: white: #ffffff

With your Selection Tool - setting in Magic Wand
Select your border
Layer / New Layer
Open your copy of the base. Copy and Paste the selection.
Image - Mirrow
Image - Flip
Without the selection.
Effects / Xero / Porcelain and apply the settings that you can look in the capture.


Selections - Inverse
Effects / 3D Effects / Drop Shadow: 2 / 2 / 100 / 15 color: #685241
Selections - All Select - Modify - Contract Selection: 2
Inverse Select. Give delete in your keyboard.
Merge all layers.

This is the moment to resize if you want at size of your choice.
In your Palette's Material put Foreground: #110d0b
Layer - New layer for your text.
In my chase I use Bernhard Fashion, size: 48 color: #110d0b
Effects / 3D Effects / Drop Shadow: 2 / 2 / 75 / 1 color:
#e3ae5b
None Select.

This is the moment to add your watermark if it is your custom to use it.
Merge all (flatten).
Save like Optimized JPG.

We finish! :)


I hope you enjoyed doing this tag!
Any doubt about this tutorial or if you have troubles for download the materials, please
feel free write to me at pspfulladdiction@gmail.com
Also, I would like look your result if you sent it to me.

Big Hugs,
Peace & Kisses
Sofía©

©Copyright Tutorial "Oh La La... París!!" Sofía©
Wrote especially for
PSPFULLADDICTION
24-09-2006
Buenos Aires - Argentina
Translated into English for Sofia©
06-09-2009


Proud Member:


3/17/2009

Last News

Hey!

OK, OK, Don't pull me on my ears! I don't forget YOU!

I'm always working for YOU, doing little things... my things, sometimes (many times maybe) you need wait a lot, I know, my apologies... but the good new is now I'm more near to reach my goal... open my website:
http://www.pspfulladdiction.com/ where I will put all my designs, creations, for sure my Scrapsets and PSP Tutorials (for now PSP Tutos only but more ahead I will add another kind of tutorials about Graphic Design).

But for now I want You knows that I'm working very hard, with a lot effort designing news scrapsets, and PSP Tutorials... and... and...

OMG! It is SO exciting for me! I can't explain how much it is!... Ok, let me take a breath... deep breath and a little fresh water... because... BECAUSE...

I'll introducing to YOU my another ARTWORK...

What I do? I say now?... or is too early yet?

Seriously ... :) I don't know what to do!!!

mmm... the true is I'm so anxious to tell you... but I need a little bit more time until I can open my website... that I said before, I'm working hardly for bring YOU My Best...

so... In short time (I hope) I'll come back to explain me in more details.

But... I guess that You'll like... I hope... I cross fingers for this.

I leave all my LOVE for You and I hope come back soon with more good news.

Kisses,

Sofía©

1/23/2009

TUT 14 " NATURAL ESSENCE "


By Sofía©
I created this tutorial in PSP X.


Elements Used:
Tubes, Selections 1, 2 and 3, Font: Stephanie Marie JF


I want to be grateful to Mariel to allow me to use her beautiful tubes in this tutorial, to her the responsibility to make the tubes and the Image's Copyright belong at their authors.


Filters:
SIMPLE, Top Left Mirror - FM TOOLS, Blend Emboss: here
DC LAYER, Mergency 4 here
PIXELLISATION, Patchwork included in Elements

Put the filters in the Complements' folder in your program PSP.
Open the tubes, duplicate it with capital letter + D, then close the original, in the copy eliminate the mark of the tuber and the backgraound if it has. Minimize.
Save Selections in your folder Selections in your PC and then upload in PSP X / Selections/ Load Selection from disc.


Let's go


1. Open a new transparent image, 550 x 412 pixels.In your palette of materials: Foreground (first plane): #ebebc5 and fill your first layer.
Layers / New Layer.In your Palette of Materials: Foreground: #ebebc5 (light green) and Background: #45701f (dark green)
Make a Gradient: Style: Linear - Angle: 140 - Repeats: 1 Invert: Without marking.

Fill your back layer with this gradient. Name this layer "Color Base"
Effects / PIXELLISATION, Patchwork and apply value 105
Effects / SIMPLE Top Left Mirror apply directly (is predetermined filter)
Copy this layer and paste as new image, minimize and save for now, then we will use.

2. Come back your work place. Layers / New Layer, name it: " Fumee 01"
Selection / Select All
Open your copy of tube Marif_2006_juillet_fumee01. Copy and Paste into the Selection. None Selection. Low the opacity of the layer at 75%. Close this layer for now.

3. Layers , New Layer
Selections / Load Selection from Disc and looking for "Sel 02_Natural Essence_By Sofía© Invert Selection: Check.
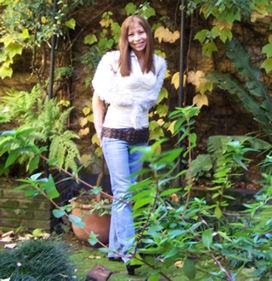
Open your copy of tube Marif_2006_aout_face055
Copy and Paste into the selection. Without take out the Selection. Layers / New Layer.
Change Gradient using same colors: Change: Angle: 140 - Repeats: 0 (zero). Fill your Selection.
Layers / Arrange / Move Down
Selection / Select None


4. Come back your layer of the girl and apply: Effects - Effects 3D - Drop Shadow: 2 / 2 / 80 / 15 color: #696b16
Load again your Selection, Invert Selection: without check and over the layer of the girl. Give Delete in your keyboard, with this we are giving a neat aspect at the excedent shadow in the face's Girl. Select None.


5. Layers / New Layer
Rectangule Tool: Line style: Solid line - width: 3 and Anti-alias: Check.
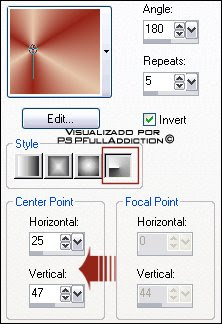
Palette of Materials: Close background color and prepare a gradient changing: Style: Radial - Angle: 222 - Repeats: 3 - Invert: without check. Center Point: horizontal/vertical: 50
Draw a rectangule from the top left vortice that cover face's girl, if you think that you doesn't do it perfect, correct it using the nodes of Pick Up Tool or use zoom to test is well done.
Effectos - Effects FM TOOLS, Blend Boss
In your layer "Rectangle" go Layers / Merge Down and merge "Rectangle and Girl's Layer"
Repeat Layers / Merge Down and merge "Girl's Layer with your Background Layer"
Rename this merge as "Frame"
Effects - Effects 3D - Drop Shadows: and apply the shadow used before. Close this layer for now.


6. Layers, New Layer.
In your Material's Palette: Prepare other gradient with same color that we use in the first gradient:
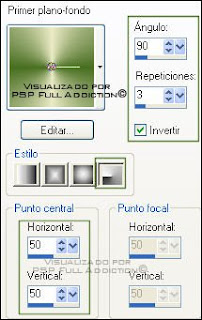
Style: Radial - Angle: 90 - Repeats: 3 - Invert: CHECK. Center Point: horizontal/vertical 50, as you can look in this capture. Fill your layer with this gradient.


7.Layers / New Layer. Selections / Load Selection from Disc and looking for your Selection 01 Natural Essence_By Sofía©,
make sure is checking: INVERT Selection. Give Delete in your keyboard. Selections / None Selection.
Adjust - Sharpness - Sharpen
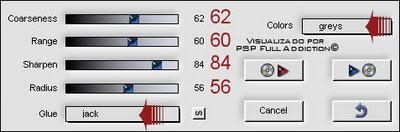
Effects - DC LAYER, Mergency 4, with the follow values that you can look in the capture:


Name this layer: "Base 1"

8. Duplicate this layer. Name it: "Base 2"
In layer "Base 2" apply:
Effects / Effects - FM TOOLS, Blend Emboss

Remember save your work in this point.

9. In your layer " Base 1" apply: Effects - Texture Effects: Blinds: white color, width: 4 - opacity: 45 Horizontal: checking


Selections / Load Selection from Disc and looking again for your Selection "Sel 01_Natural Essence By Sofía©", Invert: without check.
Give Delete in your keyboard in your layer "Base 1". None Selection.

10. Layers / New Layer: Name it: "Pilar 1"
In your Material's Palette prepare the next gradient:
Style: Radial - Angle: 0 - Repeats: 3 Center Point: Horizontal / Vertical: 50 Fill your layer with this gradient.
Selections / Load Selection from Disc and looking for your Selection Sel03_Natural Essence_By Sofía©, Invert: without check.
Give Delete in your keyboard. None Selection.
Adjust / Sharpness / Sharp
Low the opacity of the layer to 55%


11. Duplicate this layer. Name it: "Pilar 2"
Image - Resize: 113% (Resize all layers: WITHOUT check)
Selections / Load Selection from Disc and looking for your Selection Sel02_Natural Essence_By Sofía©, Invert: CHECK.
Give Delete in your keyboard.Without take out your selection go to your layer Pilar 1 and repeat this step. None Selection.


12. Open your layers Fumee 01 and Frame
Merge All (Flaten)


If you want resize your tag this is the moment.


13. Adjust - Digital Camera Noise Removal with this values:


14. Open your copy of layer "Base Color", Copy and Paste as new layer above all your others layers.
Change Blend Mode of the layer to Darken. Low the opacity at 85%.
Selections / Load Selection from Disc and looking for your Selection Sel01_Natural Essence_By Sofía©, Invert: Check
Selections - Modify - Expand: 2 pixels. Give Delete in your keyboard. None Selection.
Selections / Select All
Selections - Modify - Contract: 3 pixels. Selections - Invert - Delete. (Keep the Selection running)

In your Materials' Palette: Foreground: #ebebc5 (light green)
Flood Fill Tool, paint with this color your borde. None Selection.

15. Layer / New Layer for your Text.
Choose a font that you like, I used: Stephanie Marie JF, size: 48. With the same shadow used before, changing only : Blur 5.

16. Add your watermark if it is your custom.
Merge visible layers.
Save as Optimized JPG.


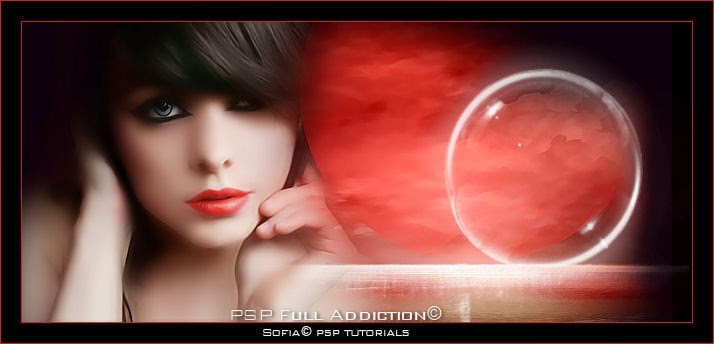
We ended, I hope you enjoyed it.Sofía©


©Copyright Tutorial " Beautiful Arrogantly " By Sofía©
Written especially for PSPFULLADDICTION©
09-23-2006
Buenos Aires - Argentina
Translate by Sofía© 01-23-2009 span>