
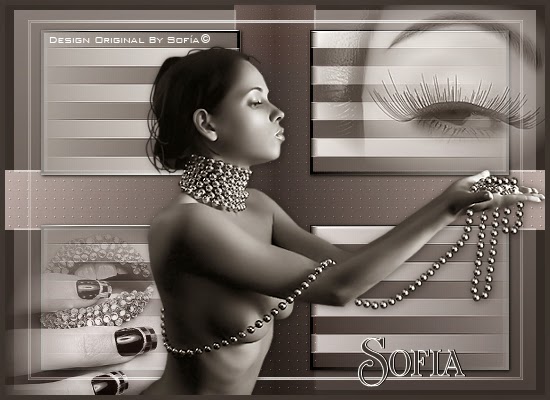
Silver Obsession
By Sofía©
I created this tutorial in PSP X.
Click on image for to see real size.
Elements Used:
Tubes, mask 20-20, Font: Rubinstein
Tubes, mask 20-20, Font: Rubinstein
Filters
L&K, Trouble,
Xero, Tekstya, FM Tools, Blend Emboss and Simple, Half Wrap
Put the filters in the folder of complements in your program PSP.
Put the mask 20-20 in your folder Masks of the Program PSP
Open the tubes, Duplicate with capital letter + D, to close the original, in the copy to eliminate the mark of the tuber and the background if it has. Minimize.
Let's go
1. Open a new transparent image of width: 550 pixels x high: 400 pixels.
2. Layers, New Raster Layer and to fill with your color of Foreground: #dcd6d4, name it Base_1
3. Layers, New Raster Layer and to fill with your color of Background: #332f2f, Change Blend Mode of the layer: Multiply, name it Base_2.
4. Prepare in your palette of materials a gradient as you see in the image: Linear style - angle: 0 - Repetitions: 0 - Invert: UNCHECK

5. Layers, New Raster Layer, name it Trouble_1 and Fill the layer with the first gradient.
6. Effects, to apply Filter L&K Trouble, with these adjustments:

7. Effects, Edge Effects: Enhance
8. Image, Resize: 85 %
9. Effects, To apply Simple Filter – Half Wrap, directly (it is predetermined).
10. Adjust, Sharpness, Sharpen
11. Layers, New Raster Layer, name it Tekstya_1 and to fill with your first gradient.
12. Layers, Arrange, Move down
13. Tool Selection, Magic Wand, to select in layer Trouble_1 the central cross that formed.
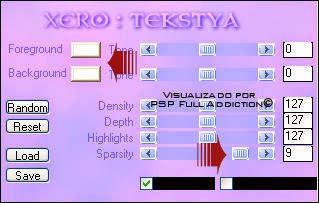
14. Go to your layer Tekstya: Effects, To apply Filter Xero Tekstya, with these values (that only will apply in the selection of the central cross)
15. Without removing selection: Effects, To apply FM Tools, Blend Emboss (it is predetermined)
16. Without removing selection: Duplicate your layer Tekstya two times and to name them Tekstya_2 and Tekstya_3.
17. In your layer Tekstya 3 (that is the one that stayed above of everything), Select, Invert, Delete in your keyboard. Invert Again
18. Without removing the selection, Layers, New Raster Layer, Prepare the following gradient: Style: Linear - Angle: 90 - Repetitions: 1 – Invert: CHECK, name it Gradient_2 and to fill in the chosen area; the inside cross.
19. Selections, Invert.
20. To apply, Effects, Filter FM Tools, Blend Emboss.
21. Selections, None Selection.
22. Change Blend Mode: Overlay
23. Return to your layer Trouble_1, Image, Resize: 85 %.
24. Duplicate this layer and name it Trouble_2
25. In your layer Trouble_2: Selections, Select All, Float
27. Selections, Modify, Contract: 3 pixels, Give Delete in your keyboard
28. Selections, None Selection.
29. Tool Selection, Magic Wand, and to select the external area of the little squares (in the cross that forms)
30. Selections, Invert
31. Effects, Effects 3 D, Drop Shadow: 1 / 1/100 / 5 / color: #000000. Selections, None Selection
32. Tool Selection, Magic Wand, you select again the exterior of your little squares of Trouble_1 and, go to the layer Tekstya_2;
33. Selections, Invert
34. Selections, Modify / Expand: 6 pixels, and you give Delete in your keyboard.
35. You go to your layer Tekstya_3. Selections, Select All. Float.
36. Return to Tekstya_2, to give Delete in your keyboard. Selections, None Selection.
37. Change Blend Mode of the layer Tekstya_2: Screen. Opacity: 44 %.
38. Image, resize: 95 %.
38. Return to your layer Trouble_1: Selections, Select All, Float.
39. Selections, Invert
39. You go to your layer Tekstya_1, and give Delete in your keyboard (you must be sure you that is stopped in your layer Tekstya_1).
40. We are going to control and correct place and blend mode of the layers, till now you would have something like this:
Trouble_2: Normal: 100 %
Gradient_2: Overlay: 100%
Trouble_1: Luminance (Legacy): 60%
Tekstya_3: Screen: 55 %
Tekstya_2: Screen: 44 %
Tekstya_1: Normal: 100%
Base_1: Normal: 100%
Gradient_2: Overlay: 100%
Trouble_1: Luminance (Legacy): 60%
Tekstya_3: Screen: 55 %
Tekstya_2: Screen: 44 %
Tekstya_1: Normal: 100%
Base_1: Normal: 100%
41. Merge all (flatten).
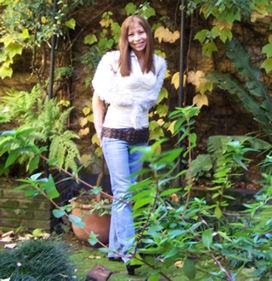
42. We open the copy of the Tube_Filly (279)
43. Layers, Load/Save Mask, Load Mask from disc, look for the mask 20-20 and apply it, make sure that Invert Transparence: UNCHECK. Merge Group.
44. Image, Mirror
45. Image, Resize: 65 % and Copy and Paste as new layer, put like you can see in image end (make sure that the hand of the model comes up to your low left corner, good near to it and that the top part of the tube does not exceed the square).
46. Change Blend Mode of the layer to Luminance (Legacy) Opacity: 85 %
47. Open the copy of the Tube_ Filly (278)
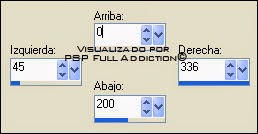
Tool Selection, Personalized Selection and to apply the following values: to see image.
48. Copy and Paste it as new image, rejects the previous one.
Layers, Load/ Save Mask, Load Mask from of disc and to apply the mask 20-20. Merge group.
Image, Resize: 90 % Copy and Paste as new layer, Put like you can see in image end, with the same care as in the previous tube without leaving that it exceeds the square, in this case of the left and lower side.
Change Blend Mode: Luminance, Opacity: 85 %
49. Layers, New Raster Layer, Fill with your second gradient, but this time: Invert: UNCHECK, name it Square_1.
50. Image, Resize: 90 %. Selections, Selection All, Float. Selections, Modify, Contract: 3 pixels. Delete in your keyboard, Selections, None Selection.
Change Blend Mode: Screen, Opacity: 75 %.
Effects, Edge Effects, Enhance
51. Open the copy of the Tube_ Filly (204), Image, Resize: 90 %
Image, mirror,
Copy and Paste as new layer in your area of work.
Effects, Effects 3 D, Drop Shadow: 1 / 1 / 50 / 12 color: #000000 (black)
52. Layers, New Raster Layer, name it: Square_2, Fill with your dark color: #332f2f
Selections, Select All. Selection, Modify, Contract: 5 pixels. Give Delete in your keyboard, Selections, None Selection
Merge all the layers (Flatten)
53. Layers, New Raster Layer for your name. In palette of materials: Foreground: #ffffff (white) and Background: #000000 (black)
Tools, Text, Font Rubinstein size in my case: 55, width of line: 1.
Effects, Effects 3 D, Drop Shadow: 0 / 1 / 100 / 0 color: black.
Selections, None Selection.
Merge all (Flatten).
54. Add your watermark if it is your custom.
59. Save as Optimized JPG.
We ended, I hope you enjoyed it.
Sofía©
©Copyright Tutorial " Silver Obsession " By Sofía©
Written especially for PSPFULLADDICTION©06-12-2006
Buenos Aires - Argentina
Translate by Sofía©
02-10-2008


No comments:
Post a Comment