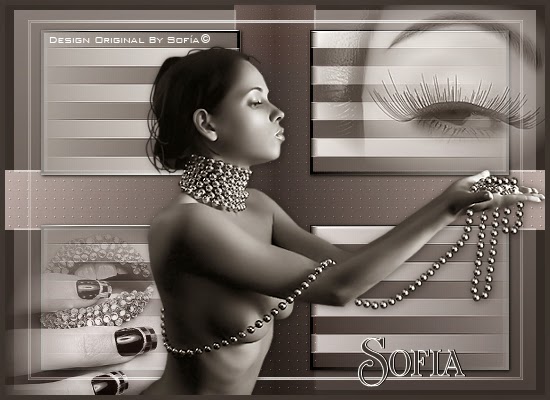
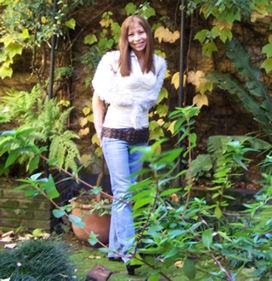
Beautiful Arrogantly

By Sofía©
I created this tutorial in PSP X.
dClick on image to see real size.
Elements Used:
Tube, Font: Chocolate Box
I want to be grateful to Filly to allow me to use her wonderful tubes in this tutorial
Filters
L & K, Mayra
DBS FLUX, Glass Pyramids
Put the filters in the folder of complements in your program PSP.
Open the tubes, Duplicate with capital letter + D, close the original, on the copy eliminate the mark of the tuber and the background if it has. Minimize.
Let's go
1. Open new image of 550 x 420 píx.
In your palette of materials: Foreground: #f9e8cd (beige) and Background: #7c1a20 it (Bordeaux)
Fill your layer Back with your dark color, Background: #7c1a20 it (Bordeaux)
2. Layers, New Raster Layer
Change the color Background to Foreground and Fill your layer with your dark color.
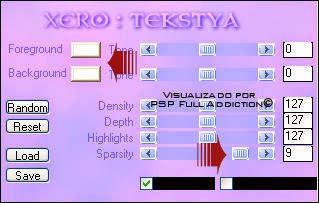
Effects, To apply Filter L and K, Mayra with these settings:
L & K, Mayra
DBS FLUX, Glass Pyramids
Put the filters in the folder of complements in your program PSP.
Open the tubes, Duplicate with capital letter + D, close the original, on the copy eliminate the mark of the tuber and the background if it has. Minimize.
Let's go
1. Open new image of 550 x 420 píx.
In your palette of materials: Foreground: #f9e8cd (beige) and Background: #7c1a20 it (Bordeaux)
Fill your layer Back with your dark color, Background: #7c1a20 it (Bordeaux)
2. Layers, New Raster Layer
Change the color Background to Foreground and Fill your layer with your dark color.
Effects, To apply Filter L and K, Mayra with these settings:
3. Adjust, Sharpness, Sharpen
4. Layers/Blend Mode: Normal Opacity: 55 %
5. Prepare a gradient as you see in the image: Style: Reflexes - Angle: 0 - Repetitions: 2 - Central Point: Horizontal: 50 - Vertical: 100.
4. Layers/Blend Mode: Normal Opacity: 55 %
5. Prepare a gradient as you see in the image: Style: Reflexes - Angle: 0 - Repetitions: 2 - Central Point: Horizontal: 50 - Vertical: 100.

6. Layers, New Raster Layer. Fill your layer with this gradient
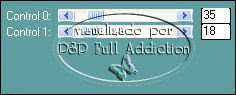
7. Effects, Filter: apply DBS Flush - Linear Transmission with the following values:

8. Layer Blend Mode: Normal Opacity: 59 %
9. Effects, Edge Effects: Enhance two times
10. Selections, Selection All. Selections, Modify: Contract: 25. Selections, Invert. Give Delete in your keyboard. Selections, None Selection.
11. Duplicate this layer and Image, Flip.
12. Prepare the gradient of the image in your palette of materials: Radial style, Angle 0, Repetitions 0, Invert: UNCHECK. Central point: Horizontal: Vertical 50: 100, taking care that your light color stay of the left side of your gradient.

13. Layers, New Raster Layer. Fill your layer with this second gradient.
Effects, apply the Filter Tramages: Glass Pyramids: 130.
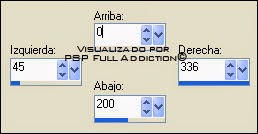
14. Tools, Selection, Personalized Selection, put these values: top: 0, left: 180, right: 370, bottom 280
15. Edition, Copy (here you can do it of two ways: you keep on developing the tutorial up to the step 20. " Paste in the selection " and newly there you give it, - nothing will happen, it will not get lost - but if you do not feel yourself safe, can paste it as new image and raise again (Copy and Paste) I leave it to your election, according to your experience with the program).
16. Selection, None Selection
17. Close your layer where you applied the filter Tramages Glass Pyramids.
18. Layers, New Raster Layer
19. Tools Selection, Selection Personalized with these values: top: 50, left: 275, right: 500, bottom: 370
20. Paste into the selection, Selections, None Selection
21. Change Blend Mode of the layer to Luminance (Legacy) Opacity: 50 %.
22. You can eliminate your layer where you applied the filter Tramages Glass Pyramids.
23. Layers, New Raster Layer
In your palette of materials, Foreground: your dark color, in this case: #7c1a20, Fill your layer with it
Selections, Selection All. Selections – Modify, Contract: 50
Selections, Invert, Give Delete in your keyboard
Selections, Invert, Selections - Modify - Contract: 2, Give Delete in your keyboard. Selections, None Selection
24. Layers, New Raster Layer
In your palette of materials, Foreground: your light color, in this case: #f9e8cd, Fill your layer with it
Selections, Selection All. Selections – Modify, Contract: 25
Selections, Invert. Give Delete in your keyboard.
Selections, Invert. Select - Modify - Contract: 2, Give Delete in your keyboard.
25. Effects, Effects 3 D – Drop Shadow: 0 / 1/50 / 1 color: #000000 (black)
26. Effects, Effects 3 D – Drop Shadow: 1 / 0/50 / 1 color: #000000 (black). Selections, None Selection
27. Layers, New Raster Layer
In your palette of materials, to continue with your color of Foreground (your light color), in this case: #f9e8cd, Fill your layer with it
Selections, Selection All. Selections – Modify, Contract: 15
Selections, Invert, Give Delete in your keyboard.
Selections, Invert, Select - Modify - Contract: 5, Give Delete in your keyboard.
Apply again the previous shadow done in steps 25. and 26.
Change Blend Mode of the layer: Screen
28. Layers, New Raster Layer
In your palette of materials, change your color of Foreground to your dark color, in this case: #7c1a20, Fill your layer with it
Selections, Selection All. Selections – Modify, Contract: 15, Give Delete in the keyboard.
Change Blend Mode of the layer: Multiply, Opacity 35 %.
Merge All Layers (flatten)
29. Open the copy of the tube Tube_filly (1144) Face, Image, resize: 76 %, Copy and Paste in your area of work as new layer, to accommodate as you can see in image end.
30. Layers, New Raster Layer
In your palette of materials, it continues with your color of Foreground to your dark color, in this case: #7c1a20, Fill your layer with it
Selections, To select everything. Selections – modify - contract: 3, click "delete" in your keyboard.
* This is the moment to resize your work, Image, resize to your taste, in my case I did it to 92 % of the original size.
31. Layers, New Raster Layer for your name
In this case I used of the Foreground the light color: #f9e8cd and Background the dark color: #7c1a20
Tools, Text – Look for font Chocolate Box, width of line: 1, size will depend on your name, in my case I used size 60.
32. Effects, Effects 3D, Drop Shadow:-2 /-1 / 50 / 2 / #000000 (black). Selections, None Selection.
33. Merge All layers (Flatten)
34. Add your watermark if it is your preference.
35. Save as Optimized JPG.
We finish it, I hope you enjoyed it.
Sofía©
©Copyright Tutorial " Beautiful Arrogantly " By Sofía©
Written especially for PSPFULLADDICTION©
06-15-2006
Buenos Aires - Argentina
Translated by Sofía©
02-10-2008