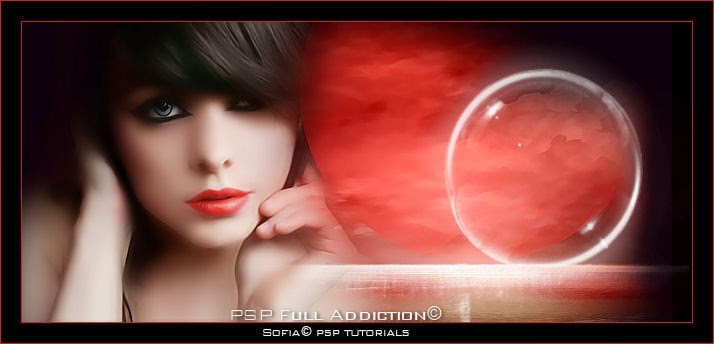
SexyGirl

By Sofía©
I created this tutorial in PSP X but it is possible to do it with any version.
Elements:
1 tube of SinTubes© "PrettyInPink", 1 tube of little silver button, 1 little button of text, 1 back
I want to say Thank You to SinTubes to allow me to use her beautiful tubes in this tutorial. You can receive her tubes and from others talented tubers if you subscribe to her Yahoo's group.
Font Will&Grace, here
and Filter Unlimited 2.0.
Open the tubes, duplicate them with Shift + D, close the original for other opportunity.
With the tube open, eliminate the layer of the watermark if it had it. Minimize it.
Let's go:
1. Open a new image: 400 x 300 pixels with background color set in: white.
Layers, New raster layer
Selection, Select all
Open our background, Copy and Paste inside the selection, name this layer "Back Color"
With the Selection running.
Selection / Modify / Contract: 10 pix
Invert selection. Give Delete in your keyboard. Selection None
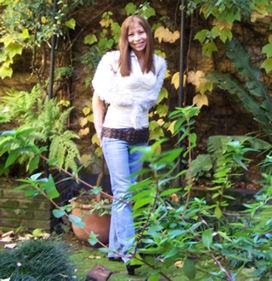
2. Open the copy of the girl's tube or the one that you like, Copy and Paste as a New Layer, arrange it at your left, name it like "Girl 1"
Effects / Xero / Soft Vignette with this settings:

Effects / Xero / Soft Vignette with this settings:
3. Effects / Effects 3D / Drop Shadow with this settings:

With the magic wand to select the white area of your layer " Back Color " and give "Delete" in your keyboard (with this you will erase the excess of shadow). Selection none
4. In the layer " Girl 1 " Duplicate it and name it " Girl 2 "
In Layer " Girl 1 " - Blend mode: Normal, Opacity: 75 %
In layer " Girl 2 " – Blend mode: Screen, Opacity: 100 %
5. Effects – Distortion Effects: Wind with the next settings:
"Wind Direction: from right / Wind Strength: 85"

6. Layers, New Raster Layer, name it " Rectangle "
In your Material's Palette: Foreground (first plane): color #000000 (black) and Background: Closed
Tool Rectangle, rectangle: width of line: 3 – Line Style: solid
Draw a rectangle (see in capture)

Convert the layer in Raster Layer, in your palette of layers with the right button of your mouse.
Selection – All Select – Float
In the layer " Back Color " give Delete in your keyboard.
In the layer " Girl 1 ", give Delete in your keyboard.
Also in your layer " Girl 2 "
And finally, to eliminate the layer where you did the rectangle and the promoted in Raster Layer.
Selection None.
To minimize.
Now we are going to prepare the word "SexyGirl", (although it is attached in the material, it seem to me like a good tip for the people whose just start to use the program, so it depends of you if use that I adjunt in material's zip or to practice how to do this example).
7. Open a new image of 300 x 200 pixels.
With the Rectangle Tool draw one with the size according at the word that you want to write, but not very big, my choice was 157 x 54 pixels for the text: SexyGirl.
Convert the layer in Raster layer in your layers' palette with the right button.
8. Effects / Filter Unlimited 2.0 / Paper Textures / Papyrus: 66/96 You Apply the filter twice.
Selection / All Select / Float
Effects / 3 D Effects / 3D Button: with the next settings and color: #808080

Selection none
Layers, New Layer for your text
9. In your materials´palette: Foreground (first plane): closed, Background: #000000 (Black)
Tool Text, looking the font of your , I used GF Skirt Smashed Size:
Write your text, in this case to make it nice I alternated capital letters and small letters but I leave it to your preference.
Palette's Layers: Blend Mode: Dissolve
Merge visible layers
10. Ok, now Copy and Paste as new layer in your work area.
Arrange it to the left side.
Palette's Layers: Blend Mode: Multiply
Open the copy of the tube of the silver little buttom, Copy and Paste as New Layer
Duplicate and arrange it in the opposite corner
Select your layer "Back color" in your Layer's Palette and with the Magic wand select the white part.
Selection – Invert
Effects / 3D Effects 3D /Drop Shadow: 4 / 4 / 45 / 4 color: #000000 (black)
Selection none
11. Layers, New Raster Layer
In your materials´palette: Foreground (first plane): #9e0e47 Background: #ffffff (White)
Text Tool: choose a font of your preference or the one that I used for my name that is Will&Grace, size: 72, stroke width: 0, Floating.
Effects / 3D Effects / Drop Shadow: 1 / 1 / 50 / 3 color: #000000 (black)
Selection – Selection none
12. Add your watermark, if it is your custom
Merge all layers
Save as Optimized JPG.
We finish, I hope you enjoyed it.
Sofía©
©Copyright Tutorial "SexyGirl" By Sofía©
Written especially to PSPFULLADDICTION©
17-03-2006
Buenos Aires - Argentina
Translate by Sofía©
01-30-2008
Proud Member:
Proud Member: