
Todo me recuerda a ti...
(Everything reminds me of You...)

Elements:
tube AngelFace_TubedByGini, tube Yoka_JdL_FlowerMisted, Text brush,
tube AngelFace_TubedByGini, tube Yoka_JdL_FlowerMisted, Text brush,
mask 20-20, frame with transparent image, font
Filter: Simple
Put the mask 20-20 in your Masks' folder on the PSP program.
Put the mask 20-20 in your Masks' folder on the PSP program.
Put the frame of transparent image in your Image Frame folder on the PSP program.
Open the brush and export it as a personalized brush.
Open the tubes and duplicate them with capital letter + D, close the original for next time.
With the open tube, eliminate the layer with watermark, if it had it. Minimize.
Let's go:
Open a new transparent image 500 x 350 pix
In your palette of materials, chose the following colors:
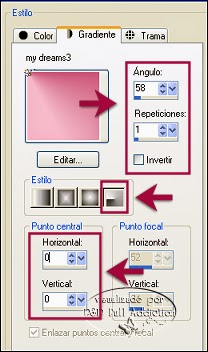
Foreground (first plane): #aa164a Background: #f7c8d8
Gradient - Radial- Angle 58 - repeat: 1 Invert: without check (as shown in the capture)
Open the brush and export it as a personalized brush.
Open the tubes and duplicate them with capital letter + D, close the original for next time.
With the open tube, eliminate the layer with watermark, if it had it. Minimize.
Let's go:
Open a new transparent image 500 x 350 pix
In your palette of materials, chose the following colors:
Foreground (first plane): #aa164a Background: #f7c8d8
Gradient - Radial- Angle 58 - repeat: 1 Invert: without check (as shown in the capture)
Adjusts / Blur / Gaussian Blur: 7
Open tube Yoka_JdL_FlowerMisted's copy,
Image, Resize 60 %, bicubic
Image, Mirror
We copy and paste as new layer in our work area, name this layer "Flower 1" Duplicate this layer, name it "Flower 2", Lower layer opacity at 75 %
Go to your layer "Flower 1", Layers, Arrange / Move up
With the tool Move, make coincide the central button flower in both layers, see example:

Layers, Merge down
Accommodate the merged bunch of flowers so that it stays in the center to your left
Layer, New Layer
Tool selection, rectangle, draw a rectangle as it is seen in the example
Accommodate the merged bunch of flowers so that it stays in the center to your left
Layer, New Layer
Tool selection, rectangle, draw a rectangle as it is seen in the example

In your palette of materials: make a Gradient similar that the first, but modify marking: Invert
Fill with the gradient Adjusts - Blur - Gaussian Blur: 7 Selection none
Effects, Edge effects, Enhance
Duplicate layer. Image / Mirror
Put the duplicated rectangle in the middle of your work area
Merge down
Effects, SIMPLE Filter: Diamonds
Decrease Opacity at 30 %
Effects - Texture Effects - Blinds with these settings:
4/60 / horizontal / Light from left /
horizontal: without CHECK / Color: White
Adjust / Softness / Soften
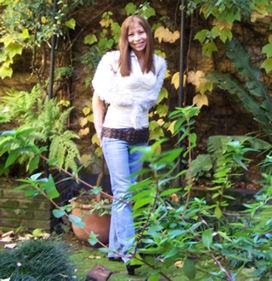
Open the copy of the girl's tube: tube AngelFace Tubed By Gini ©,
Image, mirror
Layers, Load mask of the disc, seek for the mask 20-20 and apply with these settings:

Layers, merge group
Now, Copy and Paste as New layer, name this layer "Girl", put in the right side
Now we are going to prepare a mask very simple.
Layers, New Layer,
In your palette of materials, Foreground (first plane): #9e0e47
Fill your working area with this color
Open your Selection Tool with these settings:
Now, Copy and Paste as New layer, name this layer "Girl", put in the right side
Now we are going to prepare a mask very simple.
Layers, New Layer,
In your palette of materials, Foreground (first plane): #9e0e47
Fill your working area with this color
Open your Selection Tool with these settings:
Draw a rectangle as it is shown in the capture:

Give Delete in your keyboard. Select none.
Layers / New layer, name it "Frame"
Image / Picture Frame, Seek for the frame: Transparent 01 and apply with the following settings:

Brush Tool, seek for the brush " Everything reminds me to you ... ": Size 250 Hardness: 32 Thickness: 100 Rotation: 0 Opacity 100 Blend Mode: Normal, and apply twice
Selection / Select All / Float
Effects, Effects 3D, Drop Shadow: 1 / 1 / 55 / 1 . color: black
Selection / Selection none
Layers, New Raster Layer for your text
In your palette of materials: Foreground (first plane) and background: white
Text, seek for font P22 Ruthie size 60 for the first letter of your name and 48 size for the rest of letters, floating, write your name
Effects, Effects 3D, Drop Shadow: 1 / 1 / 55 / 3 color: #9e0e47
Layers, New Raster Layer for your watermark if this is your preference.
Merge all layers.
Save as Optimized JPG.
We finish it! :) I hope you enjoyed it.
Sofía©
©Copyright Tutorial " Todo me Recuerda a Ti... " By Sofía©
Written especially for PSPFULLADDICTION©
03-20-2006
In Buenos Aires - Argentina
Translated by Sofía©
01-30-2008
Translated by Sofía©
01-30-2008


No comments:
Post a Comment