2/09/2008

TUT 7 "TAG LILA´S PARFUM"


Click on image to look in real size
By Sofía©
I created this tutorial in PSP X.


Elements Used:

Tubes, two selections, Sources: Secret Recipe

I want to be grateful to Crystal and to Patry for allow me to use her beautiful tubes in this tutorial.


Filters:

Xero - Tekstya – Tekstya,
Adjusts – Variations,
Simple - Top Left Mirror,
FM Tools, Blend Emboss
and Bordermanía
(you can find them in each name)

Remember keep your program closed while you download the filters.
Put the filters in the Complements' folder in your program PSP.
Put the selections in the Selections folder in your program PSP
Open the tubes, duplicate it with Shift + D, then close the original,
in the copy eliminate the mark of the tuber and the background if it has. Minimize it.

Let's go

1. Open a new image, transparent background of 450 x 350 pixels. In your palette of materials, Foreground: #b36dbd (purple). Fill the layer of your background with this color
2. Layers, New Raster Layer.
Prepare a gradient Foreground: #b36dbd and Background: #f0bde6,
Style: linear, angle: 45, repeat: 1, Invert: CHECK. Fill your layer with this gradient.
3. Effects, Distortion Effects: Pixelate, block width and block height: 70, Symmetric: CHECK IN. Adjusts, Sharpness / Sharpen.
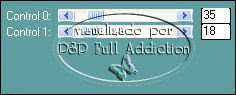
Effects, Xero - Tekstya with this settings:


4. Effects, Filter Simple / Top Left Mirror (it is predetermined)
5. Effects, Filter FM Tools / Blend Emboss (it is predetermined)
6. Effects, Edge Effects: Enhance
7. Open the copy of the tube PatryMists_06_Flowers_53. Image, mirror.
Image, Resize: 73 %, arrange at left side, look in the final result.
Edit, Copy and Paste in your work area as new layer and name this layer "Flower 1".
Duplicate layer, and name it "Flower 2"


8. In layer "Flower 1" change Blend Mode of the layer: Screen
9. In layer "Flower 2" decrease the opacity 84 %, keep Blend Mode of layer: Normal.

10. Layer, New Raster Layer. Selections, Load, Load Selection from the disc;
to look for the selection that I prepared: sel001TUT_LilasParfum_Sofía© and accept.
Fill the selection with the Floodfill Tool with the first gradient, once.
Selection / Selection none.
Effects, 3D Effects, Drop Shadow: 0/1 / 75 / 0 color: #a34f9f. Adjusts, Sharpness, Sharpen

11. Layer, New Raster Layer. Selections, Load, Load Selection from the disc;
to look for the second selection that I prepared: sel002T_LilasParfum_Sofía© and accept.
Fill the selection with the Floodfill Tool once. Selection / Selection none.
Effects, 3 D Effects, Drop Shadow: 0 /-1 / 75 / 0 color: #a34f9f. Adjusts, Sharpness, Sharpen

12. Open the copy of the tube ©rystaltubed_Joanna1.
Edit, Copy and Paste in your work area as new layer.
Image, Resize 56 %, and arrange at right side like in the final result.

13. For avoid that the image girl do not seem cut, open your Selection Tool configured in rectangle with feather: 10 and draw a rectangle at her right (in her back), then give Delete in the keyboard.

14. Layers, Arrange, Move down (twice, until the girl stays underneath the selections.)
15. Open the copy of the tube PatryTubes_06_ValentineD_07,
with the Selection Tool, in Freehand: point for point, select the small bottle of perfume.
Copy and Paste as new layer, name it "Frasquito" (it mean: small bottle). Arrange the tube at left side at same hight where start the above selection, look in the final result.

16. Effects, Adjust / Variations: click twice in magenta, 3 in blue and 8 (yes! eight) times in light, then, accept. Adjust, Sharpness: Sharpen.
Adjust, Brightness and Contrast / Clarify: strength of effect: 3.

17. Duplicate the layer, name this copy: "Frasquito 2", change Blend Mode: Luminance (Legacy).
18. Layer "Frasquito 1", decrease opacity of the layer: 30, keep Blend Mode: Normal.
19. Apply drop shadow only in the layer "Frasquito 2".
Effects, Effects 3D, Drop Shadow:-3 /-3 / 65 / 5 color: #7f317c

20. Open the tube PatryTubes_06_Elements_11, with the Selection Tool,
configured in Freehand: point to point, select a small bow purple.
Copy and Paste as new layer. Arrange at same hight of above selection and the small bottle
Adjust, Sharpness, Sharpen.

21. Layers, New Raster Layer. In your palette of materials:
Foreground: #f0bde6 and Background: your gradient.
22. Tools, Rectangle, Rectangle and we will prepare the ribbon
that hold the small bottle, look in the capture.


23. With the Selection Tool selection configured in circle
make one inside the ring that hold the small bottle, look in the capture.

24. Give Delete in your keyboard. Selections, None Selection
Try to be neat as possible because it is a final detail.
25. Effects, 3 DEffects, Drop Shadow:-3 /-3 / 65 / 5 color: #7f317c.
Decrease opacity of the layer: 60 %.
Layers, Arrange, Move until i underneath of the small bow,
now is the right moment to arrange it, if before it wasn't in the center. Merge all layers.


26. Image, Add borders: 1 pix, Symmetrical, color: white
27. Image, Add borders: 3 pix, Symmetrical, color: #f0bde6
28. Apply, Effects / Bordemanía / Frame 2, with this settings:


29. Palette of materials, Foreground: #f0bde6 - Background: White.
30. Layers, New Raster Layer
31. Text Tool , look for the Secret Recipe font, size 55, width of line: 1. Write your name.
Effects, 3 D Effects, Drop Shadow:-3 /-3 / 65 / 5 color: #7f317c
32. Add your watermark if it is your custom.
34. Save as Optimized JPG.

We finish!, I hope you enjoyed it.


Sofía©

©Copyright Tutorial " Tag Lila's Parfum " By Sofía©Written especially for PSPFULLADDICTION©
05-11-2006
Buenos Aires - Argentina
Translated by Sofía©
02-03-2008

2/02/2008

TUT 6 "BLEND GOTHIC TALES"


Click on image for to see real size.
By Sofía©
I created this tutorial in PSP X.


Elements Used:

Tubes, mask, 2 Fonts: Medieval Magic and Anglican Regular
I want to be grateful to Kat of NKDesigns and to Patry
for allow me use
their beautiful tubes in this tutorial, to them the responsibility to make the tubes
and the Image's Copyright belong at their authors.


Filters:
L&K, Filter Paris,
L&K, Filter Dimitri

Put the filters in the Complements' folder in your program PSP.
Put the mask maskgothictales_Sofía© in your Masks folder of the Program PSP
Open the tubes, duplicate with capital letter + D, close the original,
in the copy, eliminate the mark of the tuber
and the background if it has. Minimize it.


Let's go

1. Open a new transparent image, 550 x 450 pixels.
2. In your palette of materials: Foreground (first plane): #5e410a and to fill your layer of back.
3. Open the copy of the tube Kat_misted_summoningthebflies and copy and paste the tube as new layer in your work area.
4. Image, mirror
5. Image, Resize: 80 %, Resize all layers: WITHOUT CHECK,
and arrange the tube at the left side like you can see in the final result.
6. Edit, Paste as new layer and copy the tube of the girl again,
7. Image, Resize: 150 % Resize all layers: WITHOUT CHECK
and arrange to accommodate to the right, to see finished.
8. Open the copy of the tube PatryTubes_06_Objects_29.
9. Image, Resize: 80 %, Resize all layers: WITHOUT CHECK,
arrange to the left side, look in the final result like reference.
10. Change Blend Mode in this layer at: Screen.

11. Open the copy of the tube PatryMists_06_DrinksAndFood_03.
12. Image, Resize: 80 %, Resize all layers: WITHOUT CHECK, and arrange to the left side, look in the final result like reference.
13. Change Blend Mode in this layer: Hard light.
14. Decrease Opacity of the layer: 60 %.
15. In your palette of materials: Foreground: #1e1402 and Background: #8c7836
16. Prepare a gradient: Style: Linear, 45º, repeat: 1 Invert: check
17. Layers / New Raster Layer, name this layer: "Paris 1", Fill your layer with the gradient.
18. Effects / L&K / Paris, with this settings:

19. Effects / L&K / Dimitri: 80.
20. Duplicate the layer, and name it: Dimitri.

21. In the layer Paris, change Blend Mode: Screen.
22. In layer Dimitri, change Blend Mode: Multiply
23. Decrease the opacity in layer Dimitri: 50 %.

24. Layers, New Raster Layer
25. Palette of materials, Foreground: #332403, fill the layer with this color.
26. Layers, Load mask from disc: and to look for the mask that I prepared for this blend, "maskgothictales"
27. Layers, Merge Group
28. Change Blend Mode of the layer to: Luminance (Legacy)
29. Decrease opacity of the layer: 50 %

30. In your palette of materials, Foreground: #533805
and Background: the gradient that we used before.

31. Layers, New Raster Layer for your text, Text Tool,
look for the font " Magic Medieval ", size 45, width of line: 1,
write: Gothic Tales, and arrange at left side of the blend.
32. Effects, 3 D Effects, Drop Shadow: 2 / 2 / 45 / 6 color: #2a1e04
33. Change Blend Mode: Overlay.

34. In your palette of materials, Foreground: close and Background: #ead499
35. Layer, New Raster Layer, for your name, Text Tool Text, look for the font
" Anglican Regular ", size: 72, write your name.
36. Merge all (all flatten).
37. Image / Add borders: 1 pix, symmetrical, black color.
Save as Optimized JPG.

We finish, I hope you enjoyed it.
Sofía©
©Copyright Tutorial "Blend Gothic Tales" By Sofía©Written especially to PSPFULLADDICTION©05-05-2006Buenos Aires - ArgentinaTranslate by Sofía©
02-03-2008

Tutorial #5 "TAG BEIGE DELICATE"

By Sofía©
I created this Tutorial in PSP X.


I'm very grateful to Patry for her generosity in allow me to use her beautiful tubes
in this tutorial.


Elements Used:

Tubes, brush, Font: Latin

Filters:


L&K, filter Trix
L&K, filter Djin
Adjust- Variations,
Fm Tools, Blend Emboss and Simple: Pizza Slice Mirror


Put the filters in your Complements' folder in your PSP.
Open the brush and export it as a personalized brush.
Open the tubes, duplicate them with capital letter + D, close the original, in the copy eliminate the mark of the tuber and the background if it has. Minimize it.


Let's go

1. Open new image 550 x 400 pixels, transparent background
2. In your Materials' Palette, set the colors: 

Foreground: #c0c0c0 (gray) and Background: #ebddd4
3. Fill the layer with the Tool Flood Fill with your color of the Foreground: #c0c0c0
4. Prepare a gradient with this colors: Foreground #cdb1ab and background #ebddd4,
and this settings: Linear style - Angle: 45 - Repetitions: 1 - Invert: See it in the capture:


5. Layers, New Raster Layers and fill with the gradient
6. Effects, apply the filter L&k: Trix, with this settings:


7. Effects, L&K / Djin, with this settings:


8. Effects, Edge effects, Enhance
9. Effects, Adjusts / Variations, click once on Red, yellow, blue and red one again (in this order), click in light once and accept.
10. Effects/ Simple Filter/ Pizza Slice Mirror (it has predetermined values).
11. Change Blend Mode of this layer: Overlay.
12. Effects / FM Tools / Blend Emboss (it is predetermined).
13. New layer, Selection Tool / Custom Selection and apply this settings:

14. Palette of materials Foreground: #c1a29d, with the Tool Flood Fill (little bucket)
and fill our layer " rectangle "
15. Decrease the opacity of the layer to 75 % and Selection / Selection none.
16. New layer, palette of Tools, Tool rectangle: line of dots and width: 2
In your Materials: Foreground: #f1e5d7 and Background: closed


17. Make a rectangle inside our brown rectangle, look in capture,
(that you will see of dark color because it is before the dotted line is seen,
I make it like that so that it is possible to look).


18. Open the copy of the tube: PatryMists_06_Elegant_11, we going to the Girl's layer
19. Image - Mirror,
20. Image/ Resize to reduce at 78 %, bicubic, Resize all layers: WITHOUT CHECK
21. We copy and paste as new layer in our workarea,
we this tube at the left size like in the final result.
22. Effects, 3D Effects / Drop Shadow: 2 /-2 / 85 / 10 / color: #be9f9b
23. Open the copy of the tube: PatryMists_06_Flowers_89
24. Image / Resize to reduce 62 %, bicubic, Resize all layers: WITHOUT CHECK
25. Copy and Paste as new layer in our work area, put this flowers at right side of the girl,
look in the final result.
26. Change Blend Mode: Screen and Decrease the Opacity: 100 %
27. Duplicate this layer: Change Blend Mode in this layer duplicated to Normal, Opacity: 85 %
28. In your palette of materials:Foreground: #a78079, Background: closed.
29. Layers, New Raster Layer: Open the brush " agi-textureLoveLetters " size 280,
Step: 32 Density: 100 Rotation: 0, Opacity: 100, Blend Mode: Normal.

30. Apply once over the flowers, look in the final result.
31. Layers - Arrange – Move Down and put it underneath the layer of the girl (You must move the layer four times ó if you prefer, from your palette of layers you take it with the right button of the mouse and arrange it directly below the layer of the girl.
32. Open the tube of the eye, Copy and Paste as new layer. Arrange in the right top apex, look in the final result.
33. Open the copy of the tube PatryTubes_06_ValentineD_16,
we going to this layer with the small envelopes.
34. Image, Resize to 50 %
35. With the selection tool configured in rectangle you draw a rectangle over one of the small envelope with the heart and Copy and paste as new layer in your work area, arrange to the botton right side at same hight that the eyelet,
36. Image – Mirror
37. Effects, 3 D Effects, Drop Shadow: 2 /-2 / 85, 8 / color: #92716e
38. Minimize the tube of the small Envelopes because then we will use it.

39. Layers – New Raster Layer, tool rectangle with your palette of materials: Foreground: the first gradient that we did, and background: white
40. Make a very thin rectangle, from the eyelet up to the small envelope, look the final result.
41. Effects, Texture Effects - Weave: with this settings:

42. Effects, Edge Effects: Enhance
43. Effects, 3 D Effects, Drop Shadow: 2 /-2 / 85, 8 / color: #92716e

44. Open the copy of the tube PatryTubes_06_ValentineD_16 that you resized before, Select the small envelope that says: “With Love” as new layer.
45. Image - Free Rotate: Left direction - Degrees: Free:5 All layers: without check

46. Image, Resize and resize (again): 90 %
47. Effects, 3 DEffects, Drop Shadow: 2 /-2 / 85, 8 / color: #92716e
48. Open the copy of the tube PatryTubes_06_Elements_11, we going at the layer with te small bows, choose the color beige dark, with your tool selection, configured in rectangle.
49. Copy and Paste in your work area as new layer, put on the eyelet without cover it completely
50. Image, Resize 85 %
51. Effects, 3 D Effects, Drop Shadow: 2 /-2 / 85, 8 / color: #92716e
52. Layers, Merge all

We are going to make the frame:

53. Image / Add Borders: 1 pix., symmetrical, color: #be9f9b
54. Image / Add Borders: 3 pix., symmetrical, color: #f1e5db
55. Image / Add Borders: 1 pix., symmetrical, color: #be9f9b
56. Image / Add Borders: 25 pix., symmetrical, color: #f1e5db

57. With the magic wand, select this border and fill with the little bucket
with our gradient of 45º
58. Selection - Invert selection
59. Effects - 3 D Effects - Drop Shadow: 2 / 2 / 65 / 12 color: #92716e
60. Effects - 3 D Effects - Drop Shadow: -2 /-2 / 65 / 12 color: #92716e
61. Selection – None Selection
62. Image / Add Borders: 1 pix., symmetrical, color: #be9f9b
63. Image / Add Borders: 3 pix., symmetrical, color: #f1e5db
64. Image / Add Borders: 1 pix., symmetrical, color: #92716e (Watch here! because it changes ;)
If you wish resize, in this case I did it to 90 %
65. Layers, New Raster Layer for your name, in this case I used the font: Latin, size 58 white color
66. Effects - 3 DEffects – Drop Shadow: 1 / 1 / 65 / 2 color: #92716e
67. Add a layer for your watermark if it is your custom.
68. Save as Optimized JPG.

Yes! We finish! :) I hope you enjoyed it.


Sofía©

©Copyright Tutorial " Tag Beige Delicate " By Sofía©
Written especially for
PSPFULLADDICTION©05-04-2006
Buenos Aires - Argentina
Translate By Sofía©
02-02-2008

Tutorial #4 "SWEETIE BLEND MANDY MOORE"


By Sofía©
I created this tutorial in PSP X.


Elements used:

4 images and font
Link Image of the Flowers: Getty Images, here


Filters:
VM - Instant Art: Lightlines
VM - Instant Art: Vernisage


Let's go

Open a new image of 500 x 400 pixels, Transparent.
Palette of materials, pick the following colors: 
Foreground (first plane) and Background: #f0d8c2
Fill our layer base with this color
Open the image of flowers,
Layers / Promote Background Layers
With the Selection Tool in Freehand: Feather 35 / Smoothing: 5
Make an outline around the flowers (look at the example)
Selection / Invert.
Image / Resize to 65 % Resize all Layers: Check In


Copy and Paste as a new layer in your work area and place it on the right side
Decrease Layer Opacity: 40 %
Duplicate layers, name this layer "Flowers 2",
Image / Mirror and put this on the left side
Keep Blend Mode in Normal and Opacity at 100 %
Merge down
Duplicate your layer again, name it "Fusion" and in this layer apply:


VM Instant Art / Vernisage with the following settings:


Change Blend Mode in your Layer's Palette to Screen – Decrease the Opacity: 34%

Layers, New Raster Layer
Efectos / VM Instant Art / Light lines with the next settings:


Change Layer Blend Mode to Screen – Decrease the Opacity: 50%

Open the photo where Mandy is sitting, Mandy_1
Layers / Promote Background Layer
Selection Tool apply the next settings:
Freehand / Feather: 35 / Smoothing: 5
Make an outline around the model (like shown in the capture)


Copy and Paste as a new layer in your work area, name this layer: Mandy 1
Decrease the Opacity: 65 %
Image / Resize to 65 % and put below to the left side as shown in the final result.


Eraser Tool: Round Size: 40 Hardness: 38 Step: 25 Density: 100 Thickness: 100 Rotation: 0 Opacity: 50 for the dark details and to making it more delicate lower the Opacity to 12 (check it in the example above finished on the leg)
We do the same for photos 2 and 3 of Mandy and paste them as new layers to each one


Layer Mandy 2 (Layer of the middle)
Opacity of the layer: 65 %


Mandy 3 Layer (Layer with the image in the right side)
Image / Mirror and put it at the right side.
Lower the opacity of this layer: 60 %
We arrange it according to the final result or you arrange according to your preference. 😊 

When we are glad with the arrangement of the all photos we are going to retouch only in the faces of the model:


Eraser Tool: shape: Round Size 82 

Hardness: 100 Step: 25 Density: 100 Thickness: 100 Rotation: Opacity 17
In the layer “lightlines” we will erase only face and hair's model
Merge / Merge all (Flatten)
Layers, New Raster Layer
Palette of materials Foreground (first plane): white – Background: closed
Tools/ Rectangle / Rectangle (See at the final result above all)
Draw a rectangle with width of line: 2
Layers / Convert to Raster Layer
Blend Mode: Overlay
Layers, New Raster Layer
Palette of materials: Foreground (first plane): white
Tool text Size 50 / width of line 1/ Bold / Seek for the font MyDearWatson
Effects, Effects 3 D Drop Shadow: 1/1 / 50 / 3 black
You write Mandy Moore or your name
Image / Add borders / Symmetrical borders: 1 color: #f0d8c2
Add your watermark if you like it.
Save as Optimized JPG.

We're done, I hope you enjoyed it.

Sofía©


©Copyright Tutorial " Sweetie Blend Mandy Moore " By Sofía©
Written especially for PSPFULLADDICTION© in 04-04-2006
in Buenos Aires – Argentina

Translated by Sofía©
in 02-02-2008

Somewhere in the other side of the world.

Tutorial # 3B "ANIMATED SPLENDOR"

The second version of "Splendor" but animated
By Sofía©


With the completed image, in the layer named “Back”

Layers, New Raster Layer name it “Star”
Tools / Tubes, we choose a sparkle white size 25 and we apply it in a pair of places,
in my example, I put three, is just to enhance the work in some areas.


Go back to our layer “Back” Edit / Copy
We open the Animation Program
We Paste as new image the layer “Back”, duplicate the frame until we have eight frames, Minimize
Go back to your PSP program and to our layer "Star" Edit / Copy and Paste this layer
in the Animation as New Image
Now, we go to the Toolbar (in the Animation): Effects/Insert Image Effects
and we apply the next settings, option Gaussian Blur:


An animation of 5 frames will be created, we will select frames 5, 4, y 3
Edit / Copy
Paste as a new image, Edit / All Select
Go to Animation / Reverse Frames
Edit Copy / Paste / After Current Frame and we paste this new animation of the little sparkles after the last frame of our animation of stars initial.
Now we are going to have 8 pictures
Edit / All Select
Edit / Copy
We come back to our animation that had 8 frames
Edit / Paste / Into the Selection
Speed of the pictures: you keep predetermined of 10
Save according to the next settings:


Click in Next
click in Accept


click in Accept
Ready! we have finished the second version of the tutorial Animated Splendor.
You design will look like this:


We finish, I hope you enjoyed it.
Sofía©


©Copyright Tutorial " Animated Splendor " By Sofía©
Written especially for
PSPFULLADDICTION© in 01-04-2006
in Buenos Aires - Argentina
Translate by Sofía©
in 02-02-2008

somewhere on the other side of the world.

Tutorial # 3 "SPLENDOR"

By Sofía©
I created this tutorial in PSP X

Elements used:

3 tubes, Text brush, a selection, two fonts

Animation (If you made the second version)


Filter: This tutorial doesn’t use any filters.


Put the selection "sel001TUT_Splendor_Sofía©" in your Selections folder.
Open the brush and Export it as a personalized brush.
Open the tubes, duplicate them with capital letter + D, close the original for another opportunity.
With the open tube, eliminate the watermark layer, if it had it. Minimize.


Let's go

Open new transparent image 460 x 400 pix.
In your palette of materials, pick the following colors: 

Foreground (first plane): #e6c29e Background: #ffffff (white)
Prepare a Gradient, with the next settings:


Fill the work area with this gradient
Name this layer " Back "
Effects - Edge effects - Enhance more: click once

Effects - Edge effects - High Pass: with the next settings:


Adjust - Sharpness – Unsharp Mask: with these settings


Adjust – Hue & Saturation - Colorize: apply the next settings


Effects - Edge effects: Enhance
Copy and Paste the tube copy Valentines-bracelet as a new layer and
 name it "Bracelet", put this tube to the left side
Change Blend Mode: Luminance (Legacy), Decrease Opacity this layer: 80 %
Duplicate this layer and name it " Enhance " we close this layer for now.
Layers, New Layer
Selection / Load selection from disc,
Seek for the selection: "sel001TUT_Splendor_Sofía©"
Selection / All Select / Float
In your palette of materials, Foreground (first plane): #e6c29e
and fill the selection's border with this color.
(Note: if it is complicated, increase the view of your work are with the magnifying glass)
Selection, None Selection
In your Materials' Palette, configure your background with the texture "Asphalt"
or another of your choice, with the next settings: 
angle 45 / Scale: 100, in white color.


Selection Tool / Magic Wand and select the different parts of the selection
Fill with the Flood Fill Tool (the small paint bucket) each area of the selection.
In your Layers' Palette: Opacity to 40 %
Layers, New Layer
Palette of materials, we continue the Foreground (first plane)
with the color: #e6c29e we paint the layer with Flood Fill Tool (the small paint bucket)
Change Blend Mode: Multiply and Decrease Opacity at 40 %
Image / Resize to 90 % / Resize all the layers: without check.
Put in the layer Selection and with Magic Wand to select the selection,
give Delete in your keyboard
Selection / Selection none
Copy and paste the tube Kylie_minogue2, and put it at the right side
Effects - Effects 3 D - Drop Shadow:-2/-2 / 50 / 8 / black
Duplicate layer
Image / Flip, we accommodate it so that it is the reflex of the girl
Leave Blend Mode: Normal / Decrease Opacity: 40 %
Open the copy of the perfumes' tube, resize in
Image / Resize / 217 x 226 pixels Resize all layers: CHECK-IN
Copy and paste the perfume tube
Effects - Effects 3 D – Drop Shadow:-2/-2 / 50 / 8 / color: black
Duplicate layer
Image / Flip, accommodate so that it is the reflexion of the perfumes
Leave Blend Mode: Normal / Decrease Opacity: 40 %
We open our layer "Enhance" – Layers / Arrange / Bring to top
Selection Tool, FreeHand (the little rope)
Feather: 45 Smoothing: 5 and make a drawing that includes the bracelet and the rose
like is shown in the capture:


Selection / Invert
Give Delete in your keyboard
Change Blend Mode: Luminance (Legacy) / Decrease Opacity: 70%
(We do this to enhance the bracelet)
Layer, New Layer
Palette of materials for foreground color (first plane) #e6c29e
Brush Tools: Seek for the brush "Splendor" in size 150 and apply it once
Effects, Effects 3 D – Drop Shadow: -1 /-1 / 50 / 3 color: black
Palette of materials for background-color: #e6c29e for Text Tool,
seek for font AL-Landscape, with these settings:


• Note: The direction of the text is: Vertical and left

Effects - Effects 3 D – Drop Shadow:-1 /-1 / 50/3 color: black
Repeat Text Tool, Background color: #6f371f, choose font Carlota, same settings,
Rotate with: Image, free Rotation 90 degrees to the right.
Effects - Effects 3 D – Drop Shadow:-1 /-1/50 / 3 color black and place it like in the final result.
Change Blend Mode to Screen.
Image / Add symmetrical borders 3 pixels color #e6c29e
Image / Add symmetrical borders 1 pixel black color

Add a watermark if you like it.
Save as Optimized JPG


We have finished the first version of Tutorial Splendor you can leave it this way
or if you prefer and add the sparkles' animation... in this link: Tutorial Animated Splendor

I hope you enjoyed it.

Sofía©


©Copyright Tutorial " Splendor " By Sofía©
Written especially for PSPFULLADDICTION©
01-04-2006
in Buenos Aires - Argentina

and Translate by Sofía© 02-01-2008 somewhere on the other side of the world.

2/01/2008

Tutorial # 2 :"TODO ME RECUERDA A TI... "

Todo me recuerda a ti...
(Everything reminds me of You...)
by Sofía©


Elements:
tube AngelFace_TubedByGini, tube Yoka_JdL_FlowerMisted, Text brush,
mask 20-20, frame with transparent image, font
Sources of the tubes:
Gini:
High Standard Tubes (now is a private paid group)
Yoka:
Top_Design_Tubes
Filter: Simple


Put the mask 20-20 in your Masks' folder on the PSP program.
Put the frame of transparent image in your Image Frame folder on the PSP program.
Open the brush and export it as a personalized brush.
Open the tubes and duplicate them with capital letter + D, close the original for next time.
With the open tube, eliminate the layer with watermark, if it had it. Minimize. 

Let's go:
Open a new transparent image 500 x 350 pix
In your palette of materials, chose the following colors: 

Foreground (first plane): #aa164a Background: #f7c8d8
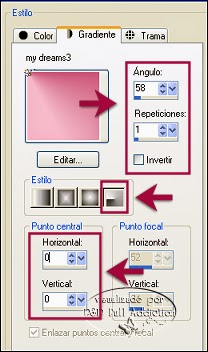
Gradient - Radial- Angle 58 - repeat: 1 Invert: without check (as shown in the capture)


Adjusts / Blur / Gaussian Blur: 7 
Open tube Yoka_JdL_FlowerMisted's copy,
Image, Resize 60 %, bicubic
Image, Mirror
We copy and paste as new layer in our work area, name this layer "Flower 1" Duplicate this layer, name it "Flower 2", Lower layer opacity at 75 %
Go to your layer "Flower 1", Layers, Arrange / Move up
With the tool Move, make coincide the central button flower in both layers, see example:


Layers, Merge down
Accommodate the merged bunch of flowers so that it stays in the center to your left
Layer, New Layer
Tool selection, rectangle, draw a rectangle as it is seen in the example


In your palette of materials: make a Gradient similar that the first, but modify marking: Invert
Fill with the gradient  
Adjusts - Blur - Gaussian Blur: 7 Selection none
Effects, Edge effects, Enhance

Duplicate layer. Image / Mirror
Put the duplicated rectangle in the middle of your work area
Merge down
Effects, SIMPLE Filter: Diamonds
Decrease Opacity at 30 %
Effects - Texture Effects - Blinds with these settings:
4/60 / horizontal / Light from left /
horizontal: without CHECK / Color: White
Adjust / Softness / Soften
Open the copy of the girl's tube: tube AngelFace Tubed By Gini ©,
Image, mirror
Layers, Load mask of the disc, seek for the mask 20-20 and apply with these settings:


Layers, merge group
Now, Copy and Paste as New layer, name this layer "Girl", put in the right side


Now we are going to prepare a mask very simple.
Layers, New Layer,
In your palette of materials, Foreground (first plane): #9e0e47
Fill your working area with this color
Open your Selection Tool with these settings:


Draw a rectangle as it is shown in the capture:


Give Delete in your keyboard. Select none.
Layers / New layer, name it "Frame"
Image / Picture Frame, Seek for the frame: Transparent 01 and apply with the following settings:


Brush Tool, seek for the brush " Everything reminds me to you ... ": Size 250 Hardness: 32 Thickness: 100 Rotation: 0 Opacity 100 Blend Mode: Normal, and apply twice
Selection / Select All / Float
Effects, Effects 3D, Drop Shadow: 1 / 1 / 55 / 1 . color: black
Selection / Selection none
Layers, New Raster Layer for your text
In your palette of materials: Foreground (first plane) and background: white
Text, seek for font P22 Ruthie size 60 for the first letter of your name and 48 size for the rest of letters, floating, write your name
Effects, Effects 3D, Drop Shadow: 1 / 1 / 55 / 3 color: #9e0e47
Layers, New Raster Layer for your watermark if this is your preference.
Merge all layers.
Save as Optimized JPG.


We finish it! :) I hope you enjoyed it.

Sofía©

©Copyright Tutorial " Todo me Recuerda a Ti... " By Sofía©
Written especially for PSPFULLADDICTION©
03-20-2006
In Buenos Aires - Argentina
Translated by Sofía©
01-30-2008